Android App Direct G-Code CAM for CNC
It is an application that can create the two-dimensional CAD's G-code in your free time.
Why I made this Android App
The first reason is that I wanted to eliminate the time and effort of making CAD and doing CAM and then G-code in a simple cutting.
Also, Since there are that the time becomes empty when going out, so I was thought it is good the time will be effective time.
CAM application tutorial

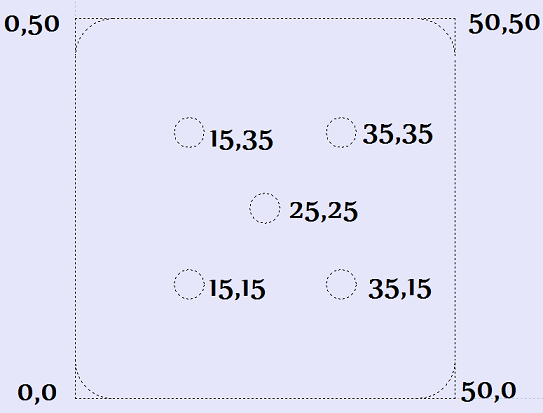
This time, we will make a motor holder of 5cm square.
I drill a hole with a diameter of 2mm through which the shaft in the center.
In addition, it will open the screw holes with a diameter of 2mm at 4 positions.
The 4 corners, we will put a R of radius 5mm.
Machining will use a ball end mill with a diameter of 2mm.
It uses an aluminum plate with a thickness of 1.5mm.
Place a discard plate underneath.
Starting position of the tool is (X = 0, Y = 0, Z = reference point).

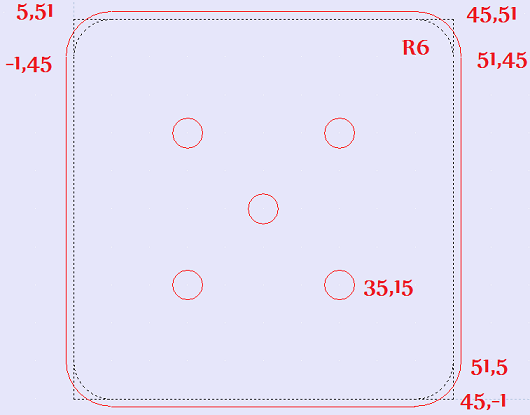
In that case, the tool path will look like the Image above.
Position of the hole does not change, but cut out the line will be shifted 1mm outside.
CAM Configuration
In the setting, enter the maximum speed to be moved at the time of no-load, And the speed at which to move during cutting.
At the same time, In consideration of the size of holding bracket, please enter the R point (reference point).
In addition, Please enter the rotation speed of the spindle.
However, this time, because making holes, set the hole first.
The dwell time is a time to wait while rotating, after reaching the bottom.
G-code produced in the CAM application
After this press the button of advertising, please look if you are interested in it.
Please ignore if not interested.
After pressing the ad button, it takes about 10 seconds to appear.
It is possible to start production of the G-code, After the start button is turned on can press state.
After you cut out, because the hole position will be displace, so please open a hole in the beginning.
Drilling, enter the location of the position of the Y-axis and the X-axis, after that press the hole button.
This time, press the button, after entering the X = 15, Y = 15 position, which close to the current position (0,0).
And repeat to a press the button, After entering the order of the center, lower right, upper right, in the upper left corner.
If you finish a hole, because every time returns to the R point, and now has become the position of the (15,35,1).
Therefore, the next step is to cut the top side line from left to right.
Since a no-load movement to the starting point of the line, enter the X = 5, Y = 51, please press the fast-moving button.
Because we use the ball end mill with a diameter of 2mm, if shifting its radius 1mm outside, to cut through appropriate size.
So takes a way to dig down straightly at this time, and then press the button cutting move by entering the Z = -2.
After this movement, if the cutting move to the right, the upper side will cut through.
Please press the cutting move button after entering the X = 45.
Then, in this state, I cut out the top right corner.
When you press the arc movement button, after Enter the end point of X = 51, Y = 45, the rotate direction selection will come out.
Since this time is clockwise, select the clockwise, and enter the radius = 6.
The cut-out right-hand side is the movement only in the Y-axis.
In the case of movement of a single axis, enter the Y = 5 only, and then press the button of cutting move.
Then X will be unchanged 51, Y will be 5, Z is also unchanged -2 position.
And it is the cutting corner of the lower right.
X = 45, Y = -1, and to choose the CW direction, and enter the radius = 6.
If After completing a cut-out in the same way, it is the completion of the motor holder.
However, please do your own measures when you cut the last side and corners, because it is expected vibration of plate.
Download Android App
Direct G-Code CAM for CNC in Google Play
